The billing of interval-related data (profiles) is called real time pricing billing (RTP billing). RTP billing allows you to define rates and prices freely across intervals and therefore enables you to structure contracts that are required in a deregulated energy market more freely.
RTP billing is based on rate models that evaluate energy requirements over a period of time. Consumption (and demand if necessary) are measured for each interval (for example 15/30/60 minutes) or for each rate period (for example peak and off-peak). The price for kWh of consumption, or kW/kWA demand is determined for every interval. This means the price may vary for every interval.
You can use RTP billing to calculate time-of-use pricing models and RTP models. You can define prices in advance or adjust prices to the spot price defined by the energy market.
Time-of-use pricing models are time-based. This means that prices are determined based on time groups.
RTP models are quantity-based. This means that prices are determined based on agreed reference quantities.
Let's start by creating profile type.


After creating profile type, we need to set up interval length. We can assign more than one interval length to the profile type.

For profile type 89 that we created, we have assigned 15, 30 and 60 minutes intervals.

Next step is to create profile version. This is important because after creating profiles and adding values to it, if any change has been made, then historical values are stored as versions. For example we have got 60 minutes interval values for consumption as 5 KWH. Now if the data has been corrected for an interval as 7 KWH, there is a version created automatically, enabling us to know which values were created from original which values.

And that's why we select "always create" option so the system would always create a version whenever there is change made to the values.

Using transaction eedm06, we now create profile header. As per below, profile 171 has been created.

Once the values for 60 minutes intervals are downloaded, the profile looks like this. We have selected this profile for 30 days period which means that for 30 days, every 60 minutes data is stored in this profile.

Now let's change a couple of values manually and see if profile versions are created. In this case, we changed values for 2 intervals. These values 10 and 15 are highlighted when we select version from the top menu.

This completes the data storage process using profiles.
Next let's look at how complex billing is performed.
The RTP interface is a data object that links the Energy Data Management (IS-U-EDM) and Contract Billing (IS-U-BI) components.
The RTP interface enables us to use the profiles maintained in IS-U-EDM in IS-U billing. In order to this, we allocate the RTP interface to the rate used for billing an interval meter.
In the RTP interface we can execute billing-relevant processing steps carried out based on profiles. For example, we can process billing agreements for periods as small as 15/30/60 minutes. The results from such processing steps are then transferred to the rate steps in the rate. Billing lines can then be created from the rate steps.
So in order to bill based on time intervals, let's start setting up day group and day type.


And now let's set up TOU(Time of USE) types and groups.

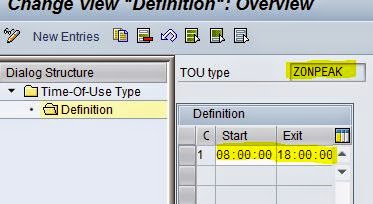
And created On Peak, Mid Peak and Off peak TOU types.

And defined time period for each of them. For example, on peak time is set as 8 am to 6 pm.
Next, let's create TOU group and assign all 3 TOU types that we created earlier to this group.


Next step is to define RTP component.

And assign TOU group that we created to this RTP component.

And activate this component by clicking the "generate component code" icon in the top menu.

Next step is to define RTP interface.

Now we need to update information on all 3 tabs showing on the top menu. Below is the details we need to update on HDR tab.

Now the result parameter tab.


And once RTP interface is defined, then enter it while creating rate using transaction EA30

No comments:
Post a Comment